Showing posts with label Facebook. Show all posts
Showing posts with label Facebook. Show all posts
Sunday, September 20, 2015
Get Full Lives in Candy Crush (No Hacking)

Candy Crush is a match-three puzzle video game released by the developer King on April 12, 2012 for Facebook, and on November 14, 2012 as a mobile app for smartphones. As of March 2013, Candy Crush surpassed FarmVille 2 as the most popular game on Facebook, with 46 million average monthly users. It is a variation on their browser game Candy Crush.
You must have a friend that rapidly send you Candy Crush Game requests. For some, this is a headache so recently i wrote an article to block Facebook App requests with three different methods. And, for some people, this is a way to time pass. But every Candy Crush player don't like zero life. Players want to play without any restrictions.
If you ever search on Google then you will find hundred ways to increase game lives or ways to get unlimited lives. Most of them are fraud ways. They said you to complete some surveys, etc. These surveys helps them to earn money but when you complete the survey, nothing happens. Other ways are difficult and also unfair. All other methods for unlimited lives are illegal and including hacking too. Hacking is serious crime and it is also against Facebook Policies. So What to do? How to get Full Lives?
Today my good friend DilPreet Singh came to my house to stay for a night with my family. We just start talking about this game. Then he taught me a way to get full lives in Candy Crush. He is not any blogger or hacker, etc. He only discover a way to solve this game's restriction. So, i decided to share this everyone. The method is simple and some of users will surprised to learn this. Method applies to all Candy Crush Games. We do not require any booted Phone or any other manipulating app.
I am using Samsung Core GT-I8262 Smartphone. When your lives came to zero then use following below steps to get full lives.
- Exit from the Game completely (From recent apps too)
- Then go to settings and Click on Date and Time option
- Change the Date to next day. Exit from Setting
- Launch the game again.
- Done. Your lives are full.
If you aren't Samsung User then the process is remain same for all Smartphones. Just change the Date to next day and hurree!! Lives Full.
Thanks to my BFF DilPreet Singh
Some Screenshots


Thank you for patronizing Design Dev. I am sure your visit to us must be quite satisfying and in line with your expectations from us. Just in case, it's not as you expected from us or if you are facing any problem, kindly forward your feedbacks directly to us by leave a Comment below or using our Contact form. And, get assured response from my side. Your feedbacks and suggestions are extremely valuable to us. Please, if you like our this post then share on your social network. Assuring you of our best service always.
How to Recover any Hacked Facebook Account?

Facebook is an addiction to many but is important for all, correct me if I am wrong but people have been so much obsessed with the social network, that many users (I personally know) have started using Facebook at work, family gatherings, at the airport, and where not? However, addiction like this can sometimes be harmful, not physically but mentally. It happens when an account of a person who is very much addicted to Facebook gets hacked.
Yesterday my good friend just call me. Her friend's Facebook Account was hacked. The guy who changed her password was changed her Email ID too. So, a girl or anybody who have no knowledge regarding this all, can recover her Account again?
Well, this is a good question. Here i mentioned some steps. Follow then but first read that how you can lose your account.
How you lose it?
An example could be: Since those regular users who always like to log in to their Facebook accounts to check their updates of ‘every second’ without caring if they are at some cafe, friend’s place or office etc. sometimes end up losing their Facebook profiles due to their utter fearlessness and carelessness. Some people share their passwords who closed to them, sometimes to their family members or some to their friends too. Looks Unbelievable but true. Many Softwares or apps also designed by hackers to steal passwords. So do not add unwanted Applications. Download applications from trusted and tested sites only.
How to recover my hacked account?
If you are one of those addicts whose Facebook account has been compromised due to the above mentioned carelessness or any other blunder, then you should follow the following steps to recover it:
Step 1: Go to www.Facebook.com/hacked/
Step 2: Click on My Account is Compromised

Step 3: Enter Email, Phone, Username or Your Fb Name.

Step 4: Enter your Old Password or Current Password.

Step 5: Maybe it will ask you to upload image of your Govt. approved ID Proof i.e. Passport, Adhaar Card, Driver License, Ration Card, etc. After uploading Proof it will reviewed by Facebook. If you upload correct proofs then sure it will send you a link in your Email. Click that link.
Step 6: Or, just click Continue on Secure Your Account.

Step 7: Set a new Password; Of course unique.

Step 8: Done.
Now you successfully recover your Facebook Account. But this time, don't share your password with anyone. LOL!! Hope this tutorial guide you. If you still have some problems then leave a comment below.
Add All Friends to Facebook Group in One Click 2015

Have you ever created a Facebook group, well most of us have tried it but the problem we face is that we can't get many members to it. So in this post I will be sharing the code to add all your Facebook Friends to any group either it may be your's or it may not be. This code will simply add everyone without even their permission. On one hand it may be irritating for others but on the other hand (that's yours) it will be quite helpful.
There are many extensions of Chrome which offer the same, but we would not recommend those as most of them not just add friends to a group but also tries to spam your profile in one way or the other.
Note: Use Google Chrome Browser for it.
Follow the steps to Add All Friends to Any Facebook Group:
- Open the Facebook group where you want to add all your Facebook Friends. Note down the number of members in the group.
- Press
Shift +Ctrl +J Button to open up Developers Window. - Copy the Code below or click here and paste it in console window.
- Press Enter and wait for 10-20 Seconds. (If your friend list is long then it might take some 2-3 minutes)
- Now All your Friends will be added to the Group.
- You may confirm it by noting down the total members of the group.
Post Last Updated at: 24 April, 2015
Thank you for patronizing Design Devta. I am sure your visit to us must be quite satisfying and in line with your expectations from us. Just in case, it's not as you expected from us or if you are facing any problem, kindly forward your feedback's directly to us by leave a Comment below or using our Contact form. And, get assured response from my side. Your feedback's and suggestions are extremely valuable to us. This Post is written by Harman Singh Hira. There is no any source so Copying or using this post for your own site is not allowed. If anyone do so get ready for facing DMCA. Please, if you like this post then share on your social networking sites. Assuring you of our best service always.
10 Steps to Secure Facebook Account

Facebook is become number one website on the Web. Even you are also log in to it every single day from many devices, like from your mobile phone, computer, laptop and your office workstation. There is a chance that you may leave your Facebook account without logging out. If your account gets accessed by any strangers then it’s going to open up a large can of worms. So you should seriously try to prevent unwanted access to your account.
One more Possibility for Account Hack is; if your smartphone or device gets stolen then. It’s a whole different matter. There are many ways to prevent access to your Facebook Account. In this article, we will go through some important options you can take to prevent others from accessing your personal Facebook account.
So, lets get Started...
1. Strong Password
You already have your password created for Facebook however it is advisable for you to make sure your Facebook password is one of a kind and different from your other online accounts e.g. email, blog, hosting etc.
To change your password, go to Account Settings > General > Password.
The best password is the combination of Small and Capital letters, Numbers and Symbols.
2. Add Phone Number
Confirming your mobile number is one of many ways to enhance your account security on Facebook. This way, even when you lose or forget your password, Facebook will be able to send you a new one via SMS.
To add your mobile number, go to Account Settings > Mobile and click on Add a Phone.
Select your country and set the mobile carrier before clicking Next.
Now you will be given an instruction to send an SMS to the given number. Follow the instructions to get a code via SMS, and then enter the code into the column. You also have the option to Share your number with friends on Facebook and Allow friends to text me from Facebook. Select your preferences and click Next.
Now your mobile phone is registered with Facebook, and when the need arises, this connection will be useful to reactivate your Facebook account.
3. Activate Trusted Contacts
Almost everyone have trusted friends and of course they are your friends on Facebook. Or, you must have family members added on your account. So, why should you don't add them as trusted contacts.
To add your trusted contact, go to Account Settings > Security and click on Trusted Contact.
Choose Trusted Contents
4. Activate Login Notification
When you or anyone login to new or untrusted browser then i will send Email or SMS.
To activate click Account Settings > Security and Login Notification

Click the check box of Email and Text Messages.
5. Activate Trusted Browser
Check once in a week your Trusted Browser.
To add your trusted browser, go to Account Settings > Security and click on Trusted Browsers.
6. Disconnect Previous Active Sessions
The good thing about Facebook is that it lets you know about your previous active sessions, where you log in from, and what devices you used to access your Facebook account. Now to make sure your account is safe, from the Account Settings > Security page, look for ‘Where You're Logged In‘ and click on Edit.

Now all previous sessions will be listed, together with the current active session at the top of the list. Click on the link ‘End Activity‘ to kill the activities from other devices.
7. Don’t ‘Keep Me Logged In’
The moment you want to login to your Facebook account, at the Log In page, there’s a small check box that says Keep me logged in. Make sure this box is unchecked. Then, log in as usual. With this on, you will be asked for your email and password every time you launch Facebook.

8. Avoid Spam Links
Facebook is serious about spam and is always enhancing its features to make sure you are safe from being a victim to scams. The types of attacks include money scams through direct or indirect requests via Facebook messages, chat etc, phishing links that will redirect you to fake websites, malicious links that could retrieve your personal information or even harm your computer. There are also chances you may receive emails from ‘Facebook’ but it is actually from a phishing website, this is part of a scam.
9. Sign Out After Use
Lastly which is the most important for all (and definitely worth repeating), never forget to log out from your Facebook account.
10. Don't Share your Password to Anyone
Never share your Password to anyone whether he/she is your Friend or any Family Member.
How to Track Facebook Logged in Locations?

Social networking sites vary in the levels of privacy offered. For some social networking sites like Facebook, providing real names and other personal information is encouraged by the site (onto a page known as a ‘Profile‘). These information usually consist of birth date, current address, and telephone number(s). Some sites also allow users to provide more information about themselves such as interests, hobbies, favorite books or films, and even relationship status. However, there are other social network sites, such as Match.com, where most people prefer to be anonymous. Thus, linking users to their real identity can sometimes be rather difficult. Nevertheless, individuals can sometimes be identified with face re-identification. Studies have been done on two major social networking sites, and it is found that by overlapping 15% of the similar photographs, profile pictures with similar pictures over multiple sites can be matched to identify the users.
On May 12, 2011, Facebook announced that it is launching several new security features designed to protect users from malware and from getting their accounts hijacked. Facebook will display warnings when users are about to be duped by clickjacking and cross-site scripting attacks in which they think they are following a link to an interesting news story or taking action to see a video and instead end up spamming their friends. Facebook also offers two-factor authentication called "login approvals", which, if turned on, will require users to enter a code whenever they log into the site from a new or unrecognized device. The code is sent via text message to the user's mobile phone. Facebook is partnering with the free Web of Trust safe surfing service to give Facebook users more information about the sites they are linking to from the social network. When a user clicks on a potentially malicious link, a warning box will appear that gives more information about why the site might be dangerous. The user can either ignore the warning or go back to the previous page.
How to Track Logging in Locations in Facebook?
#1: Log in to your Facebook Account.
#2: Click on Settings.
#3: Then click on Security from the right side menu.
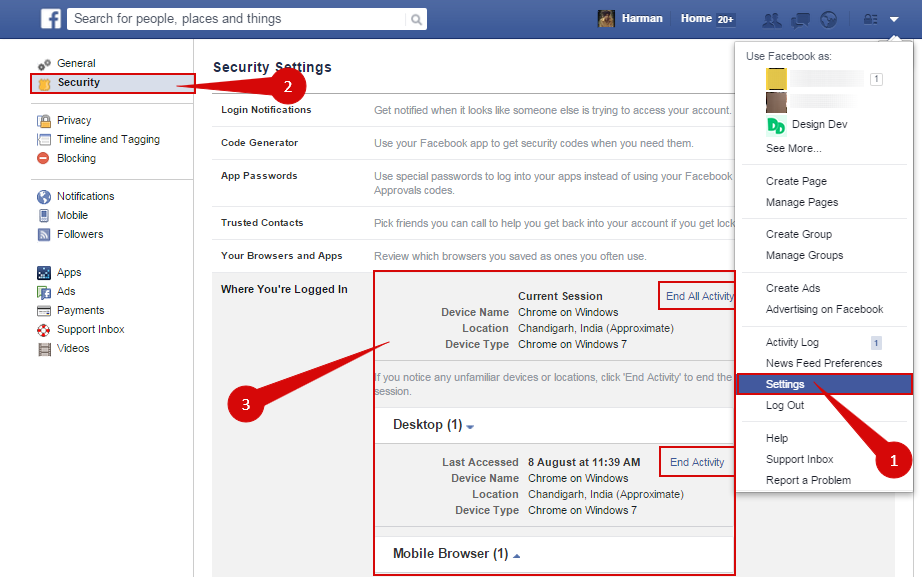
#4: Now, click on 'Where You're Logged In' option.
#5: The list will be appeared where your Facebook account currently opened.
#6: You can End activity by clicking on 'End All Activity'.
#7: Done.
Thank you for patronizing Design Devta. I am sure your visit to us must be quite satisfying and in line with your expectations from us. Just in case, it's not as you expected from us or if you are facing any problem, kindly forward your feedback's directly to us by leave a Comment below or using our Contact form. And, get assured response from my side. Your feedback's and suggestions are extremely valuable to us. This Post is written by Harman Singh Hira. There is no any source so Copying or using this post for your own site is not allowed. If anyone do so get ready for facing DMCA. Please, if you like this post then share on your social networking sites. Assuring you of our best service always.
Invite All Friends To Facebook Page By Single Click

Hi there, after some amazing posts on blogging and Social media I'm back with a tutorial post. This post will allow you to invite all of your friends to any Facebook page. You might be thinking that I posted the same thing before too?? Yes its posted before and the code is still the same but there's a change, A change in Facebook Page Layout. Facebook changed its page layout recently and thus due to this reason many people are not able to use the old technique. So in this post I will share the step by step guide on how to invite your friends to new Facebook layout pages.
We all make Facebook pages no matter on what topic it is. We make pages for our blog, website, brand, public figure or we even make pages for fun. So is making pages enough?
Obviously no!! You will have to get likes on your page so that your target audience can get your posts and updates. But wait!!! It is not that easy to get likes, so what I and most of us do is just invite all of our friends to LIKE our FACEBOOK Page. In this way our friends get a notification and there is a 50% chance that they will open up your page and like it.
But wait again!! Will you invite all your friends manually? I mean won't it take time? In hours? So to overcome this time problem we have come up with a simple code that will automatically invite all your friends to like your page with a singe click.
Lets get started!! Just Follow the given steps:
#1: Open your Page without log in as Page. (By typing Page Name in Search)

#2: Click on "Invite friends to like this Page" from left side box.

#3: A popup will be appeared. Scroll Down all Load your All Friends
#4: Press
#5: Copy the code given below and Paste in Console Box then hit the enter button.
var inputs = document.getElementsByClassName('uiButton _1sm'); for(var i=0; i<inputs.length;i++)
{ inputs[i].click(); }
#6: All of your friends will be invited automatically.
#7: This process can take up to 2 minutes depending upon the number of friends you have.
Thank you for patronizing Design Devta. I am sure your visit to us must be quite satisfying and in line with your expectations from us. Just in case, it's not as you expected from us or if you are facing any problem, kindly forward your feedback's directly to us by leave a Comment below or using our Contact form. And, get assured response from my side. Your feedback's and suggestions are extremely valuable to us. This Post is written by Harman Singh Hira. There is no any source so Copying or using this post for your own site is not allowed. If anyone do so get ready for facing DMCA. Please, if you like this post then share on your social networking sites. Assuring you of our best service always.
Now Choose Who Use Facebook After Death

Facebook is a place to share and connect with friends and family. For many of us, it’s also a place to remember and honor those we’ve lost. When a person passes away, their account can become a memorial of their life, friendships and experiences.
Today we’re introducing a new feature that lets people choose a legacy contact—a family member or friend who can manage their account when they pass away. Once someone lets us know that a person has passed away, we will memorialize the account and the legacy contact will be able to:
- Write a post to display at the top of the memorialized Timeline (for example, to announce a memorial service or share a special message)
- Respond to new friend requests from family members and friends who were not yet connected on Facebook
- Update the profile picture and cover photo
Alternatively, people can let us know if they’d prefer to have their Facebook account permanently deleted after death.
Until now, when someone passed away, we offered a basic memorialized account which was viewable, but could not be managed by anyone. By talking to people who have experienced loss, we realized there is more we can do to support those who are grieving and those who want a say in what happens to their account after death.
Here’s how to choose a legacy contact:
Open your settings. Choose Security and then Legacy Contact at the bottom of the page.


After choosing your legacy contact, you’ll have the option to send a message to that person.


Source : Facebook Newsroom
Thank you for patronizing Design Dev. I am sure your visit to us must be quite satisfying and in line with your expectations from us. Just in case, it's not as your expected from us or if you are facing any problem, kindly forward your feedbacks and comments directly to us by leave a Comment below or Contact us. And, get assured response from my side. Your feedbacks and suggestions are extremely valuable to us. Please, if you like this post then share on your social network. Assuring you of our best service always.
How to Block Facebook App Requests? (3 Methods)

If you’re on Facebook, chances are you have at least one friend that incessantly sends you invitations to play “Candy Crush Saga,” the smartphone puzzle game that has become the most popular game on the social networking site. The invites may come from ex-girlfriends (or ex-boyfriends), distant family members or childhood friends you haven’t spoken to in a decade — Candy Crush’s addictive allure knows no bounds.Candy Crush makes money for its developer, King.com, by forcing users to pay for new levels, though users can get around this by inviting their Facebook friends to the game. Given the reward for sending invites, it’s unlikely you’ll ever get the Candy Crush addict in your social network to stop, but it turns out that there is a way to turn off Candy Crush announcements.It’s hard to avoid the masses of people playing Candy Crush Saga, the addictive hit game by King.com. But you can avoid them and the annoying notifications they send you on Facebook.
Like Candy Crush Saga, there are many Apps on Facebook those you don't want to play and makes you angry by Invites. But not anymore. Here are few Simple Steps to Block Facebook App Requests. So lets check them.
Method 1 (Recommended and Easy)
- Log in to Facebook and pull down the notifications tab on the top right of your home screen.
- Hover over the X next to one of your App or Game notifications, which will prompt you to “Turn off”.
- Click the X, and it will give you the option to Turn Off or Keep On, Click Turn Off.
- Done. Its so Simple

Method 2
- Log in to Facebook. Go to Settings then Click Blocking Tab.
- On the Right Side. Scroll Down and look for Block apps.
- Type App Name. Select App.
- Done. Hurree...

Method 3 (Not Recommended)
- Log in to Facebook. Go to App Center then Click Activity.
- On the Left Side, Click Invites.
- Click X from the left side for your App which irritates you.
- You can also Block the App from their too if you want.
- Done.


So, these are three methods to Block any App or Games. Hope my this tutorial guide you well but if you have still problem then just leave comment below.
Thanks
How to Report Suicidal Post to Facebook (2 ways)

Social media and suicide have an important relationship. In one widely known case, the death of Phoebe Prince, it is generally believed that her actions were motivated by cyberbullying. In 2008 police in the United Kingdom expressed concern that "Internet cults" and the desire for achieving prestige via online memorials may encourage suicides. Vincent Nichols, the Archbishop of Westminster, has warned that popular social networking sites lead young people to form "transient relationships" which put them at risk of suicide when they collapse. One of the rising research questions being asked by psychologists is where kids are getting the idea of suicidal tendencies. One of the explanations that have risen is the cause and effect relationship between social media advertised suicides and younger generations being influenced by them. One of the reasons behind kids being influenced by suicide tendencies via the internet is the psychological explanation behind "fifteen minutes of fame." Media tends to blow up videos and Facebook status' in order to inform the public of the rising trouble. However the media has yet to taken into consideration the band wagon appeal it brings to the young and immature minds of teenagers. Learning that an action like this can give a teenager, "fifteen minutes of fame" influences other teens who might feel under appreciated to do the same thing in order to gain attention. There was a research study conducted by the School of Public Health at the University of Sydney, Australia. This study was conducted in order to research whether there is a correlation between suicidal ideation and social media exposure to suicide stories among young adults (14-24). The study concluded that one of the most mentioned sources of suicide stories were social websites. This in mind, there was also a reported rise in feelings of hopelessness and suicidal tendencies among the participants surveyed. (Dunlop, More, and Romer 2009) [Wikipedia]
Recently Facebook started a tool to prevent Suicides if victim posted any suicidal status on Facebook. If your any friend or family member any such thing like this then you can save his/her life by taking a simple steps; just reporting his/her status to Facebook Team. You also check this page on Facebook about Suicide Prevention. There are two ways to report Facebook regarding this matter. First way is effective (according to me), recommend and easy also. But, i mention all two steps. Its up to you, which one you used (if in this situation)
#1 Facebook's Suicidal Content Report Page
- Click here
- Fill the form correctly
- Just click Send button
- Done
#2 Report on Post directly
Step 1: Click on the Down Arrow of the Post
Step 2: Click choose a option I don't like this post.

Step 3: Then a popup will appear. Select a option I think it shouldn't be on Facebook
Step 4: Click Continue

Step 5: Now choose an option It's threatening, violent or suicidal then of course Continue

Step 6: At last, select Suicidal Content or you can choose Self-harm option too.
Step 7: Click on Continue button.

Step 8: After this all, Facebook show you various option i.e. Offer help or support, Reach out to friend, Ask us to look at this post, Chat with the trained helper, Call lifeline, etc. It is depend on your country and region where you are living.
I hope this post will guide you well. God never made the situation like this but if you are in this situation, your stills can save someone's life.
Image Courtesy: United Academics
Thank you for patronizing Design Devta. I am sure your visit to us must be quite satisfying and in line with your expectations from us. Just in case, it's not as you expected from us or if you are facing any problem, kindly forward your feedback's directly to us by leave a Comment below or using our Contact form. And, get assured response from my side. Your feedback's and suggestions are extremely valuable to us. Please, if you like our this post then share on your social network. Assuring you of our best service always.
How to Bypass Facebook Photo Tag Verification?

How to remove photo tag verification of Facebook with best and easy trick, so for giving to this question I come with a trick. This trick helps you to getting your Facebook account without doing any type of photo tag verification. Actually many of my friends and our site users not able to get ride from Facebook photo tag verification. Actually its a security issue , disable your Facebook account which required photo tag verification. But this is really hard to do.Few month ago i was also facing this problem but did photo tag verification. but Facebook again disable my Facebook account so i choose different method, you can proof your Facebook account by submitting your real id.
Why you facing this Problem?
Many Facebook users thinks that after using real account and real name why Fb wants proof of there identity. The reason is that, its a Fb security system. I means when FB notice that a user using any feature excessively , Than Fb security system thing that the person may another person or its a fake. So Fb security system catch the person and start doing verification, So If you complete your verification then it will good but If you can not do this verification then you must see our trick.
How to Avoid this?
- Facebook have Some policy and terms which you should always follow.
- Do not tag to stranger person on photo, otherwise he/she report you.
- Do not send friend request to strangers which is unwanted.
- Do not send any unwanted message to strangers.
- Do not share any bad or block link.
- Try to keep same name of Fb account.
Requirements:
- An Android Phone
- WiFi or Internet Connection in it
How to?
#1: Go to Google Play Store and Install ProxyDroid App.
#2: Open the App and Change the Proxy to USA.
#3: Now go to Facebook and Make Login of Blocked.
#4: You’ll not seen any Photo Verification Process.
#5: You will be asked for Phone number, even if you did not provide your number in that account.
#6: Enter Phone No. and click Submit
#7: Then you’ll be taken to a confirmation page asking for code, you will receive the code in Mobile. Enter it and click on Submit.
#8: Congo! Your account is now unblocked
Thank you for patronizing Design Devta. I am sure your visit to us must be quite satisfying and in line with your expectations from us. Just in case, it's not as you expected from us or if you are facing any problem, kindly forward your feedback's directly to us by leave a Comment below or using our Contact form. And, get assured response from my side. Your feedback's and suggestions are extremely valuable to us. This Post is written by Harman Singh Hira. There is no any source so Copying or using this post for your own site is not allowed. If anyone do so get ready for facing DMCA. Please, if you like this post then share on your social networking sites. Assuring you of our best service always.
How to Verify Facebook Page or Profile?
- Journalists
- Popular Brand or Businesses
- Government Officials
- Celebrities
These are the four categories of pages which can be verified by Facebook.Suppose if you have any local business which is popular then Facebook may claimed your page if you are official representative. Then their is no need to submit any type of request to Facebook. They automatically claim your page as verified depend on some details and minimum requirements mention by Facebook.
How to Verify?
If you have pages mentions above ten there will be chances to get your page verify in Facebook. Your page must be official represent your local business or any personality and may be have some popularity on Facebook. when you create faecbook page fill all the real info about your or your business so facebook will get to know that your real person. you need to follow some instructions
- Link To Your Profile or Page From Official Website and also link website on your page or profile.
- Provide accurate information in details about your business in About Section of Page or Profile
In About section must add significant long and short description, keyword who represent your business, Email, Website, Products and verified page location with claimed business address and other details in Page Info tab.
To send them Facebook page verification request you need to follow the link given below and fill the real information.
Fill in the required information and send request and than you are done. Best Of Luck.
Difference between Facebook Profile, Page and Groups

Facebook can be confusing, especially for those just starting out with it. I hear a lot of people getting confused between profiles, pages and groups. Most of them are of course, new users. People like me who have been using the service since long time, have adopted with the new things that eventually came along. But for new users just starting out, this can be a confusing process. So, it is important to know about differences between Profiles, Pages and Groups.
#1: Profile
A Profile is the basic privilege you get when you first sign up. After you have completed the basic sign up process, you're redirected to your profile.
Profiles are meant to be personal, for individuals and not for business. If you want a personal account, like most people, you'll have to sign up for an individual profile. Facebook prohibits creating personal profiles in the name of business because profiles are meant to be for individuals only. According to the information provided in the Help page:
Personal profiles are for non-commercial use and represent individual people.Your Facebook profile will contain your personal and public information including your name, age, gender, interested in, workplace, hometown, school etc. You can add friends, upload pictures, share statuses but you cannot run promotional ad campaigns on behalf of, say, your business. So, you're limited to sharing personal information only. A single profile can be run by one person only.
#2: Facebook Pages
Pages are meant for celebrities and businesses. If you have a business you legally run and operate, you can create a page about it. It will contain information on your business, include promotional offers, official events etc. Facebook is a great way to reach your audience and grow your business. Which is why, more and more businesses are desperate to grow their online presence on the site.
The core difference between a Profile and Page is in their purpose. While Pages are meant to serve commercial purpose (like Business or Celebrity), Profiles are meant for non-commercial purposes only. Facebook also has strict policy regarding this. You are not allowed to create a personal profile for your business. But you may open a page on your name, but if you're willing to connect with your friends and family, you should create a profile which allows you to add friends. You cannot add a friend through your Page. Also, you'll need a Profile to maintain a Page. A Page can be administered by more than one person.
Pages look similar to personal profiles, but they offer unique tools for businesses, brands and organizations.
#3: Facebook Groups
Groups serve the purpose of connecting a community of like-minded people. Groups can be created by anyone and based on the type (open, closed, secret), others may be able to join. Profiles and Pages look the same, but Groups have a different layout. A Group can contain thousands of members and be administrated by more than one person.
Usually, Groups are created surrounding different topics like Pets, Computers, and Common Interests etc. Anybody can join an Open group but Closed Groups require admin approval. Secret Groups are private and can only be seen by admins and members. Closed groups can be seen by anybody, but only accepted members may join in. Open groups are free for anyone to join.
In a Group, you can post statuses, images, videos, notes. You can interact with other group members even if they're not on your friend list, but you cannot see their private information that is only shown to their friends.
Source: Ravi Stuff
Thank you for patronizing Design Dev. I am sure your visit to us must be quite satisfying and in line with your expectations from us. Just in case, it's not as you expected from us or if you are facing any problem, kindly forward your feedbacks directly to us by leave a Comment below or using our Contact form. And, get assured response from my side. Your feedbacks and suggestions are extremely valuable to us. Please, if you like our this post then share on your social network. Assuring you of our best service always.
How to Completely Delete Facebook Account?

If you're seriously considering deleting your Facebook account, you're not alone. Start typing in the letters "dele" into Google and you'll see "delete Facebook account" as a top suggestion. Whether it's to alleviate privacy concerns or avoid digital distractions, more people are trying to figure out how to fully disconnect themselves from the social network giant that we live and breathe.
For those ready to call it quits, you're in for a surprise — it's more difficult than you think to erase yourself permanently. With its ever-changing privacy policies, becoming Facebook-free requires more steps than just hitting the delete button and saying goodbye.
Keep in mind deletion is not the same as deactivation. You can deactivate your account at any time, which means your Timeline and information will disappear from Facebook until you reactivate your account. When reactivated, your information is restored.
Deleting your account means you can never, ever access your account again, and you won't be able to retrieve any of your content or information.
Most of your personal data, like your email and mailing address, is removed from Facebook, but some information, such as messages and photos, may remain on its server for "technical reasons." Facebook's Help Center also says the data left behind will no longer be identifiable or searchable as your own, and that it will be inaccessible to other people using Facebook.
If you 100% want out, follow the step-by-step guide below to erase your Facebook footprint and make sure your account is gone for good.
#1: Back up your Facebook information.
Save photos, contact and birthday information and other data you'll need while your account is still running. Once your account is deleted, this information will be inaccessible. We recommend downloading a copy of your Facebook data, which comes in the form of a ZIP file consisting of all your posts, including photos and videos. Here's how:
- Log in to Facebook
- Then Go to Settings or Click here
- Click “Download a copy of your Facebook data.”
- Now click on “Start My Archive.”
- Finishing it by clicking "Start My Archive"
Your Archive File will sent to your Email.
#2: Save your Facebook Photos and Videos
Click here to Download your Facebook Albums.
Under Facebook's Terms of Service, when you delete your photos and videos (also known as IP content) or your account, it is erased in a way similar to emptying the recycle bin on your computer. Removed content may exist in backup copies for a "reasonable period of time," but will not be available to others unless someone who had previous access to the photo or video has a direct link to it. Photos will only live in the content delivery network's cache for a restricted amount of time, according to CNET.
#3: Check your linked apps.
Facebook has become so ingrained in our web activity that we have used it to sign up and log in to most third-party apps, games or websites.
We log in with our social network accounts to save time and help the app become better personalized for us. But without realizing it, we're actually giving third-party developers permission to access, store and update the precious information we share.
What information exactly? Our "basic information," which includes our user ID, any public information and our friend list.
Here's how to check the apps connected to your Facebook account:
Go to Settings then Click on Apps or click here

Popular apps that may be listed here are Pinterest, Instagram, Spotify and Pandora.
However, some apps such as Tinder will only allow you to use the app with a Facebook account. If this is the case, you'll need to decide if you absolutely can't live without that app and rethink deleting Facebook.
The trick here is to go to these apps and see if you can change your form of login by using your email address or Twitter handle instead. Your goal is to completely cut off any association between the app and your Facebook account.
#4: Turn off your apps on Facebook.
Once you've changed your form of login in the apps, it's a good idea to remove and disable them in your Facebook settings to be safe
Click here to know that "How to Disable App Platform on Facebook".
#5: Clear your Facebook history.
This should be great if you clear your Facebook History too. To Delete your Facebook history click here to know
#6: Now, delete your Facebook account.
Finally, it's time to cut ties with Facebook itself.
It's no coincidence that it's a hassle to find the Facebook account deletion page. Click here, and type in your login information if it asks.
Then, click the "Delete My Account" button. After you have confirmed that you want to delete your account, check your email to make sure the deletion process has started. If you don't see it, check your junk folder.

Make sure to avoid logging into your Facebook account for 14 days. If you login during this two week period, your account will be restored.
According to Facebook's Data Use Policy, it takes about one month to delete your account, but some information may remain in backup copies for up to 90 days on Facebook's end.
Original Source: Mashable.com
Thank you for patronizing Design Devta. I am sure your visit to us must be quite satisfying and in line with your expectations from us. Just in case, it's not as you expected from us or if you are facing any problem, kindly forward your feedback's directly to us by leave a Comment below or using our Contact form. And, get assured response from my side. Your feedback's and suggestions are extremely valuable to us. This Post is written by Harman Singh Hira. There is no any source so Copying or using this post for your own site is not allowed. If anyone do so get ready for facing DMCA. Please, if you like this post then share on your social networking sites. Assuring you of our best service always.
How to Schedule Facebook Status Update? 5 Ways

Lets get started with the list of services that allow to schedule Facebook status updates in advance for free. I have sorted them according to ease of use, so that you won’t have problem in choosing the one which suits you and your needs.
#1: Later Bro

Looking for the easiest way to schedule Facebook status updates for free? then this the one to go with. Just schedule Facebook status update after few basic settings and you are done. Allow it to post on your behalf ( compulsory).
You can Schedule:
How to do it.
- Click on sign in with Facebook
- Allow app all permissions as it is required to post on your behalf.
- Now it will ask about Time-zone. Set the correct timezone or it will not post according to your need.
- You are done!, just schedule Facebook status updates for free and enjoy.

This scheduler is a paid one with an option of FREE PLAN which allows upto 5 accounts and 10 schedule post.
You can Schedule:
- Google Plus
- Log-in with Facebook.
- Allow permission of posting on your behalf as it will be used to post later as per your scheduling.
- Now Write a status and schedule from the button given at the right bottom of the same text box.
- You have successfully pre-scheduled your Facebook status update.
#3: Post Planner

Third in the list is the PostPlanner, which is free as a Facebook app and yet another method to schedule Facebook status updates in advance.
You can Schedule:
- Go to the website, click on “Sign in with Facebook”.
- It will redirect you to Facebook app.
- Signup with your email to schedule Facebook status.
- Now you are free to schedule Facebook status in advance.
#4: Hootsuite

This fully loaded Social Media Management(what they call it) is pretty much user friendly even with its loads of features. You can easily schedule Facebook status updates with this free service.
You can Schedule:
- Google Plus
- YouTube
- & 35 more
- Simply sign-in with Facebook.
- Register with your email.
- Set your Time Zone
- Now go to dashboard and write a status schedule it for future from Top Text box
#5: IFTT
IFTT stands for If This then That. This one is my favorite as it is completely free and pretty advanced with options of all social media and bookmarking sites.How to use it.
First of all, you have to activate TIME and Date channel by going HERE and selecting “Facebook”. Then select your Time zone, and you have successfully activated this channel.
- Now “Create a Recipe”
- Then, click on blue highlighted “IfTHISthenthat” there.
- Now you will be redirected to options with lots of ICONS. Select “Date and Time” option.
- Now select that you want it every day, every hour, every day of the week or every year on. As we want it to be done once and then we will delete the RECIPE, so I would advice to go with “Every Year On”.
- After that, select date and time at which you want to schedule Facebook status update for.
- Three options with different methods of status update will appear – Plain text update, link post, Post with Image. Select the one which you need.
- Finally, a box will appear where you have to write down your status.
- Click on “Create Action”, then click on “CREATE RECIPE” and you are done !
Thank you for patronizing Design Devta. I am sure your visit to us must be quite satisfying and in line with your expectations from us. Just in case, it's not as you expected from us or if you are facing any problem, kindly forward your feedback's directly to us by leave a Comment below or using our Contact form. And, get assured response from my side. Your feedback's and suggestions are extremely valuable to us. This Post is written by Harman Singh Hira. There is no any source so Copying or using this post for your own site is not allowed. If anyone do so get ready for facing DMCA. Please, if you like this post then share on your social networking sites. Assuring you of our best service always.
Subscribe to:
Posts (Atom)